 Well winter has arrived and if you have never tried flying off snow it really adds a thoroughly enjoyable new dimension.
A couple of years ago I made my first set of skis from a Perspex car number plate. They were not overly successful but did give me an insight into the pleasures of winter flying.
Further research turned up many and varied ideas for holding the skis at the correct angle during flight, springs, rubber bands etc.
I then came across Bruce Stenulson’s site in the US which is excellent and full of useful information. Bruce’s torque rod solution was simple compact and above all worked.
Mk 1 – Perspex. To small (9”x2”), heavy, difficulty mounting spine and used a wheel collet which with its small grub screw didn’t grip the axle well enough.
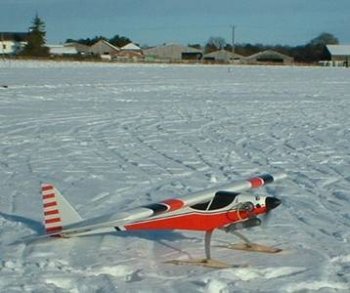
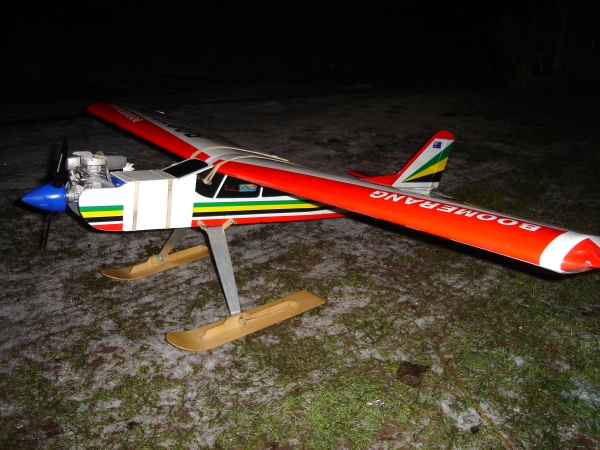
Mk 2 on a 2.5kg / 5 1/2lb Wot 4.
These were just about perfect allowing take off’s, landing’s and touch and go’s in 8” of new virgin fluffy snow. So after a whole winters use I estimate that was roughly 300 landings because touch and go’s become addictive in the snow.
So how were they constructed !
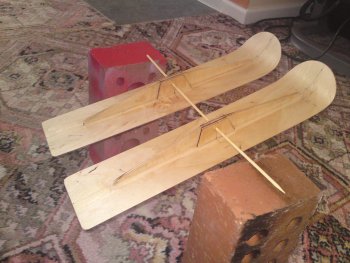
Each ski was 14” long and 3” wide and from 1/16 th birch ply. The spine and side supports were from 1/8th birch ply. I didn’t put on a keel strip and can’t say I needed it.
I also used waterproof PVA although Bruce uses CA. I felt it would give better gap filling properties and a small fillet for increased strength.
I varnished mine with a spray on polyurethane varnish only because I already had some but brush on would do just as well. I also waxed my bases to ensure the snow/ice didn’t stick to the bottom.
Bruce say’s it’s not necessary but I did get some sticking before waxing. Aerosol furniture polish I guess would also do.
If you do use a fuel proof paint I suggest a light colour to prevent sun warming which will cause icing on the bottom.
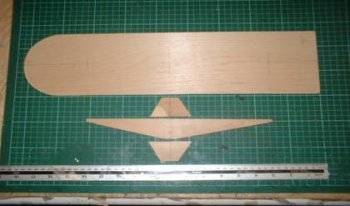
To mark tip shape, I used a compass. Mark the centre line and mid axel point, this will make fitting the spine easier. The spine was 9” long, (3 1/2” front, 1” middle, 4 1/2” rear) and 1 ¼” high. Centre doublers to match. With slightly more spine wood towards the rear and the tip curled backwards, this will naturally give a slight rearward balance for safety, which will hold the tip up should you lose the torque rod. I found it easier to now glue the doublers on the spine ensuring they are vertical. This means that when you attach the spine it will stand vertical un supported when weighted while the glue dries.
Don’t make the spine any taller, remember the side forces when turning on the ground and prop tip ground clearance needs watching and may need a taller undercarriage.
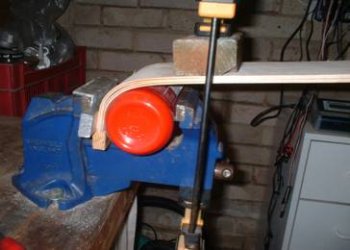
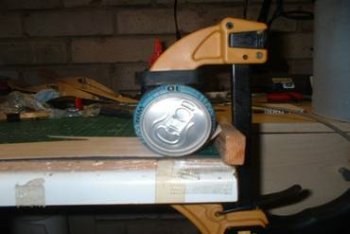
Bending - soaking in boiling water for no more than 1 1/2 mins (otherwise delamination will occur) works but then takes a day to dry, to long for me.
So I clamped both base pieces together in a vice and then used a hot air gun to heat the wood and glue as boiling water would. Then a large clamp hooked on the vice jaw pulled the tips to the required curve. Once cooled they retained the shape. Quick and simple and no waiting for the wood to dry.
There are other ways and if done one at a time a block and full can also works.
I also suggest not shaping the ends until bent as this will give you a larger leverage area and prevent distortion to the narrow tip.
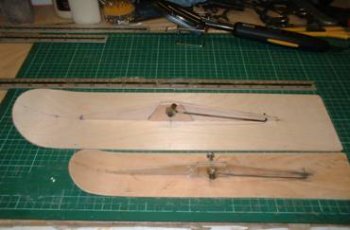
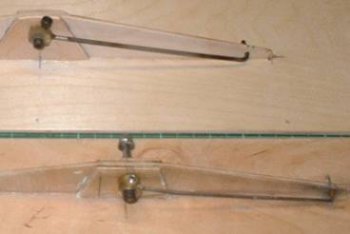
MK1 used a wheel collet to hold the torque rod but the grub screw was too small and gave little grip. MK 2/3 use a slice of 1/2 brass rod drilled and taped to take a 4mm screw - much better. The larger drilled collets also gave the 2mm torque rod (piano wire) a better soldered joint. I found it easier to mount the torque rod with a 90’ bend then drill the spine hole to match.
Mounting was as simple as removing the outside wheel collet and wheel and replacing with the skis - 5 minutes to switch max.
My wheels and axles weighed 55g, skis 115g. The extra 60g is so near the cog that all that was required was a few clicks of up elevator. Trail draggers work best as do undercarriages mounted on the fuz.
Tricycle could work so long as you remember 40% of the weight is at the nose. Wing mounted usually means they are further back so wire flex could allow the leg to flex backwards on landing and so catch a tip, just as in a nose peck on wheels. (I know from my Mk 1’s).
Technique requires a lot of up elevator on the ground to ensure the ski tips ride the snow until it rises up onto the plane just like a boat. Also raise the tail to slightly above horizontal when tightening the skis so they point up slightly during landing. The torque rod may even hold the tail up on the ground which is good. I didn’t bother with a tail ski as the drag was minimal and may even have assisted in holding the plane straight like a rudder, plus adding weight to the tail would probably effect to cog.
Scale up or down to suit your plane weight with 1/16 base good for up to say 3.5kg. (8 lb).
Remember it is about area not length that’s why the Mk 3’s are only 30 % longer but 66% wider. Longer = more load on the mounting screw.
Finally PLEASE CHECK YOUR COG BEFORE FLYING you don’t want any surprises.

:edit: Mk 3’s for a 71” 5.8kg / 13lb Extra 260 Base 1/8 birch ply 18” x 5”, spine and doublers 1/8” ply plus extra centre 1/2” balsa supports. This much tougher ply was softened in boiling water and bent around a strong former and left to dry. The torque rod diameter was also increased to 3mm.
David Baker
And so Terry made some skis. Made with a keel on the bottom and a torque rod set made from brass and wire - for keeping skis level.